|
Now that the editing is done, it’s time to move onto the next exciting step in publishing your book – creating the mock-up. This step isn’t strictly necessary – but I like to encourage it because it gives a clear sense of how much space will be taken up by text and therefore what restrictions the illustrator will have. You don’t need to be an artist to create a decent mock-up, as you’ll see from my terrible drawings here. But your illustrator will find this invaluable, and it will really smooth out the entire process.
Now, you should already have chosen your page size in step 1, so measure it out (roughly – nothing we do today needs to be exact) on a sheet of paper, and cut out the shape. You’ll need one page for every two in your page count. (I.e. if your book is 24 pages, you’ll need 12 sheets of paper). Glue, staple or stick them together with sellotape when you’re done to create a book. Now comes the fun part, using your page plans created in step 2, start visualising each page, creating outlines for artwork and sticking your text in. Have a look at this: 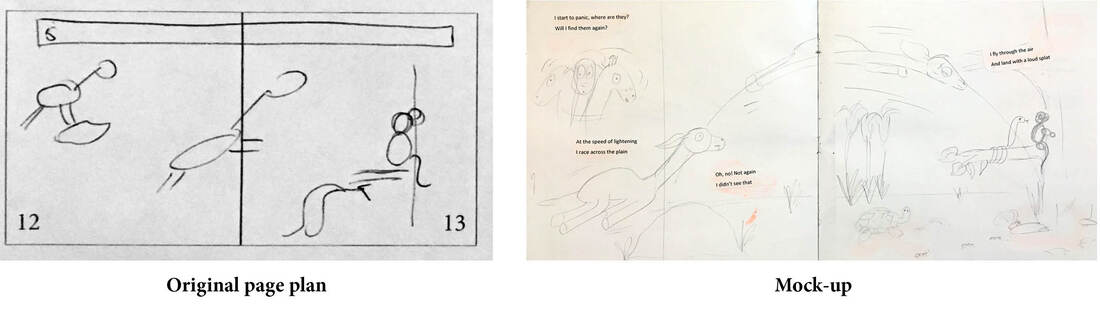 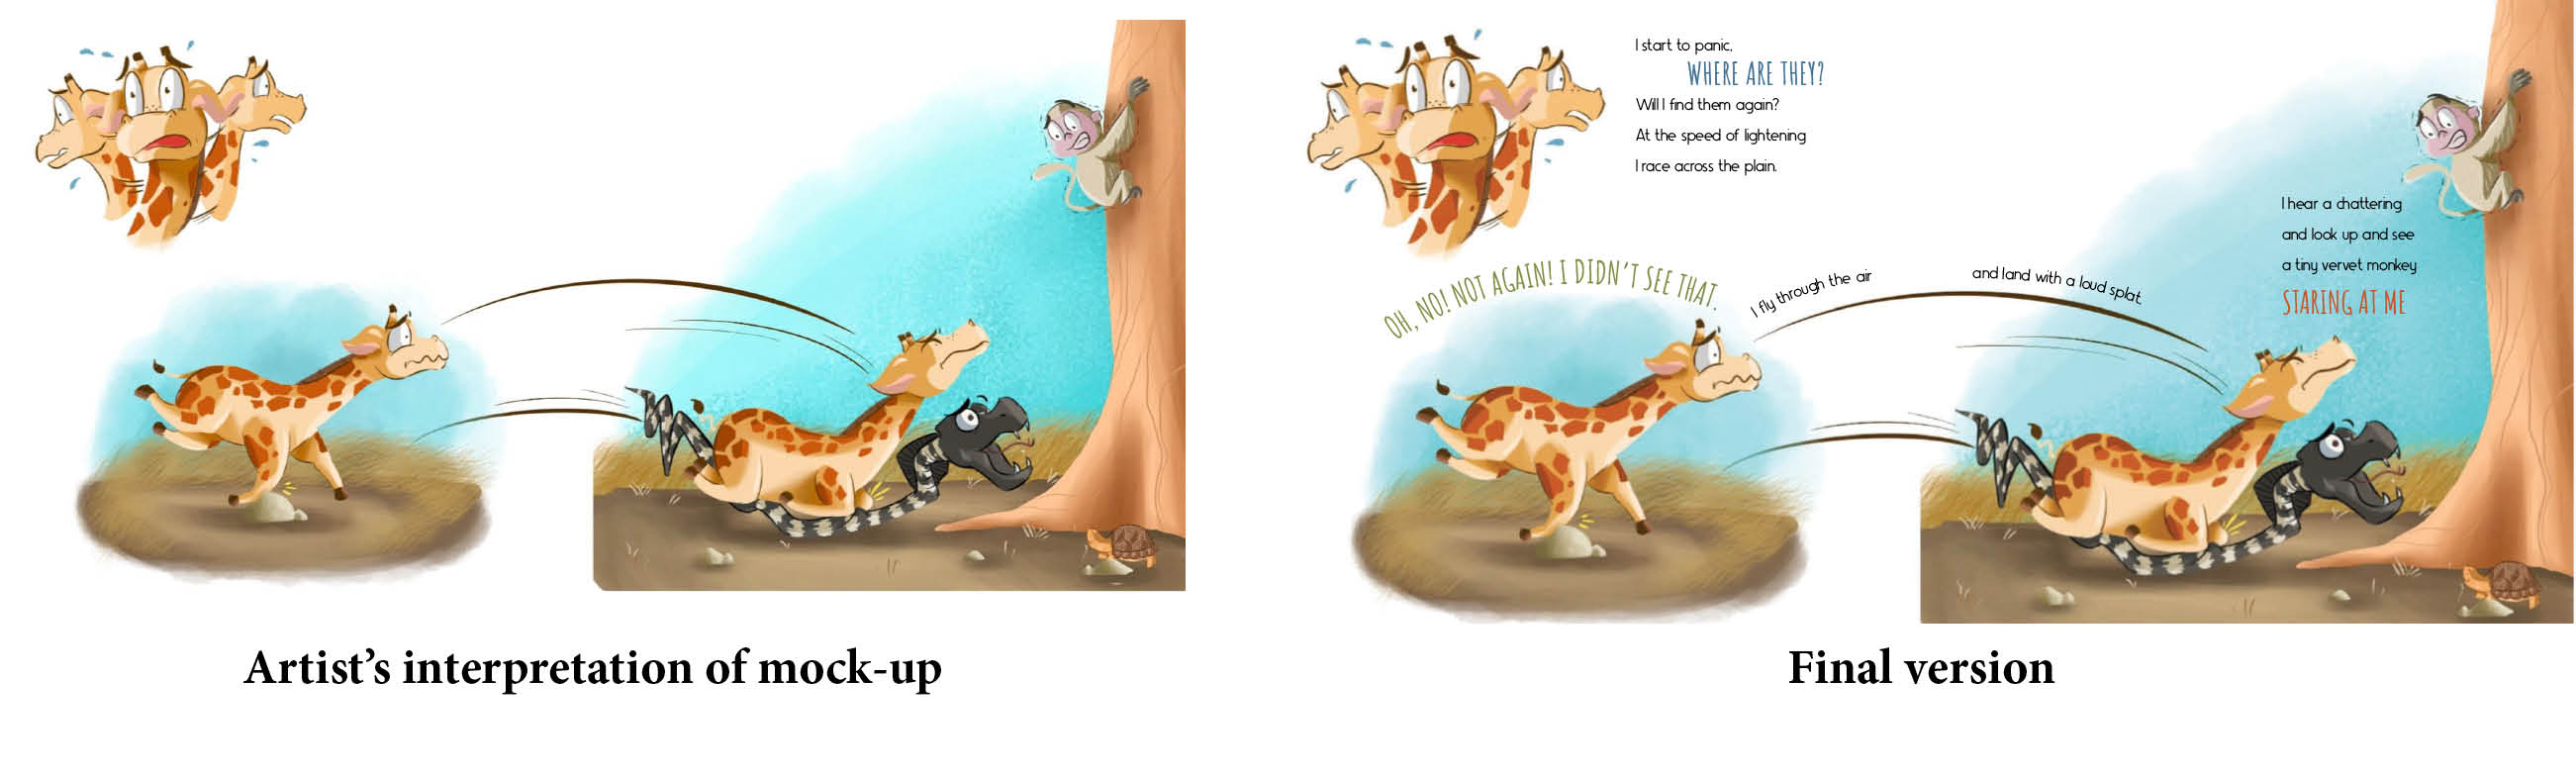 I cannot emphasise enough the importance of a good edit. It simply isn’t sufficient to just have your husband or friend read through your story.
A good editor does more than dot the i’s and cross the t’s. A good editor really gets into your story and makes sure that all of it makes sense. You, as the author, are actually in no position to judge your text effectively. A good editor should:
Understanding the different job descriptions:
(Neither of the above rewrite your story for you. If you are looking for that, then it’s a ghost writer you need and not an editor.) You are really saving nothing by trying to skimp on paying for editing. All you’ll be doing is adding another poorly put together book onto the pile that gives self-publishing it’s bad name. The cost With children’s picture story books, the text is usually under 1,000 words, so the editing does not have to be a huge expense. There are plenty of online editors on platforms such as Fiverr that are reasonably priced. Read their ratings and reviews before making a commitment. A 1,000 word edit will probably cost between £25-£50. If it’s much cheaper than this, I’d be tad concerned. There are some very common mistakes that I come across during editing:
Editor/author agreement If you are working with an editor who has a good reputation, then I wouldn’t bother with this type of agreement. I personally feel it’s only necessary when the editor comes unrecommended. At the end of the day, an agreement is only worth the intent of the people signing it, and if you really don’t trust the editor enough to work without the agreement, then maybe you should look for a different editor. However, all that said, here is a PDF of a simple editor/author agreement for you to download and use if you feel it is necessary. Hopefully you’ve done step 1 and are now ready to plan your text. You’ve probably already got the bones of your story written out, so it’s time to figure out if you’ve got enough content, too little content, and how it’s all going to fit together in an awesome book. Things that need to be decided are:
Word count Consider 1,000 words to be your ceiling and aim lower. The exact amount of words really depends on your writing style and the story. I’ve worked on children’s books with as little as 280 words, and as much as 998 – and both of these extremes are amazing books. If you’ve already chosen your winning samples in step 1, you can use this to guide you.
The two books above are the same size, have the same page length, but – as you can see – a very different target audience and word count. The illustration style also makes a difference to the amount of words that one page can allow. Page count The most common page count for picture books seems to be 24 pages (excluding cover). Most print-on-demand companies will require that the last page is left blank. This leaves you with 20 pages to fill (if you are going with 24 pages). Books are generally set up like this:
Page planning This is the last step in getting your text ready for the editor. This is crucial yet highly fun part of the book creation procedure. It’s where you plan the overview of your book. Below is the rough page plan of The Accidental Hero. As you’ll see, you don’t have to be an artist to produce page plans. Any funny squiggles will do, as long as they make sense to you. Repetitive layout (see spreads 8-9, 12-13 and 20-21) are an awesome feature to include. 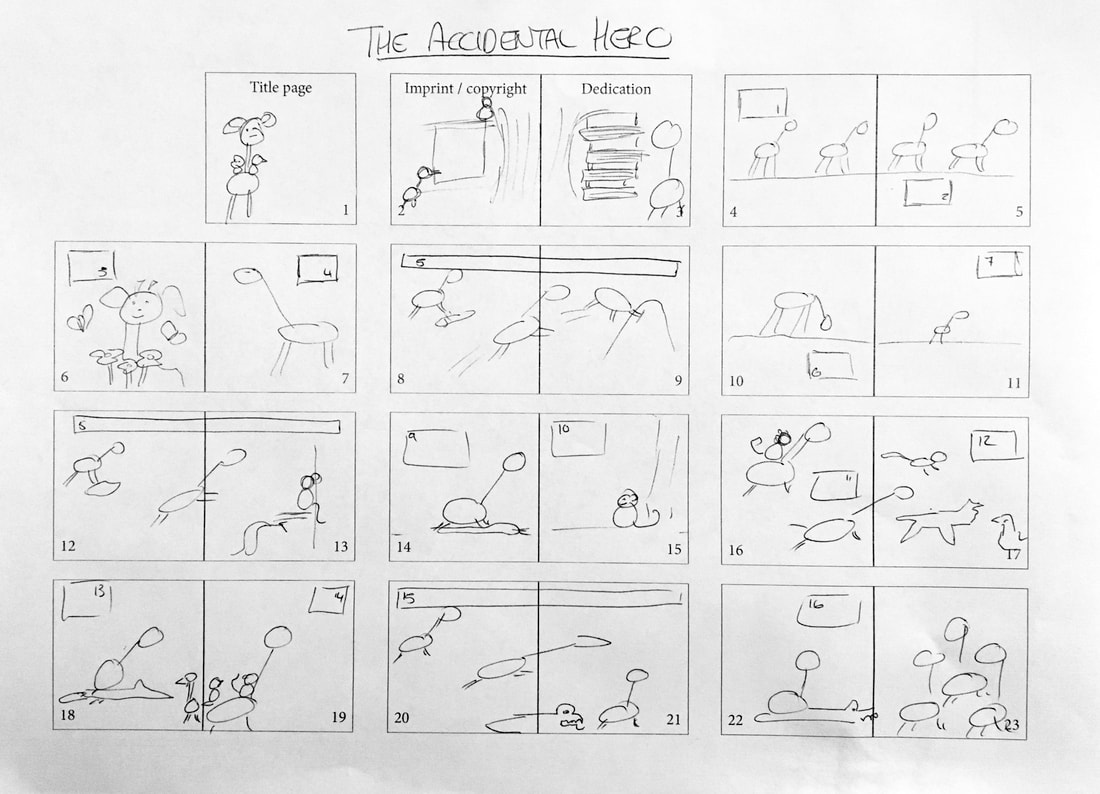 With The Accidental Hero, I’ve made allocation for 16 text boxes, each with roughly four lines. This makes it easy for me to finalise the text. If I have 17 stanzas, then I’ll need to go back to the page plans and see where I can include the last one. Or I need to get rid of one.
Start creating your own page plans for your book by downloading a blank page plan template here. So, there you are. You’ve written a good story and have great visions of getting it published. So now what? How to turn these words into a book? My advice is to start with taking a trip to the bookstore. Seriously. A physical trip to the bookstore (obviously with COVID, this might be impossible, and then you’ll need to improvise). Seeing physical books on shelves and being able to touch them, feel them, smell them is a gift to anyone who wants to make a book. Look at books that are similar in content, length or have a similar target audience to the book you want to create. Hopefully one of the ones you pick up will speak to you, and you’ll be like, “This is it.” Or maybe it’s a couple of books – the size of this one, the binding style of that one, the paper in a third. Then get intimate with the books you choose – take photos, write down their names, get their numbers, measure the size (you might need to buy the book first). I have a large collection of children’s books and I often browse them when I’m searching for inspiration. What you are hoping to come away with after this exercise is:
Page size: You need to choose something that works with your printing service, and also your budget. Perving over a hardcover, embossed book is one thing, but if your printer (or wallet) can’t handle it, then that’s a bit pointless. Popular book sizes are below. The sizes are in inches, because that’s what KDP uses, and most self-publishing authors will make sure of this service (I do). For those of us in the metric system, I’ve included a standard A4 page in the background for reference. Also note that if you are going with IngramSpark, their landscape size is 11" x 8.5". 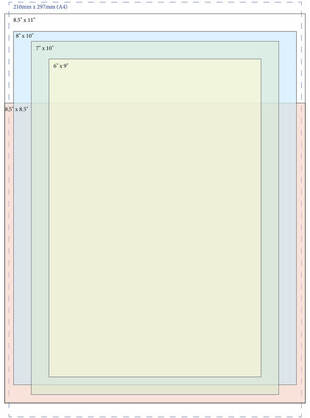 Binding: There are three basic options when it comes to binding children’s books:
IngramSpark offer all three binding types, as will most traditional printers. The type of binding will naturally affect the cost of printing. 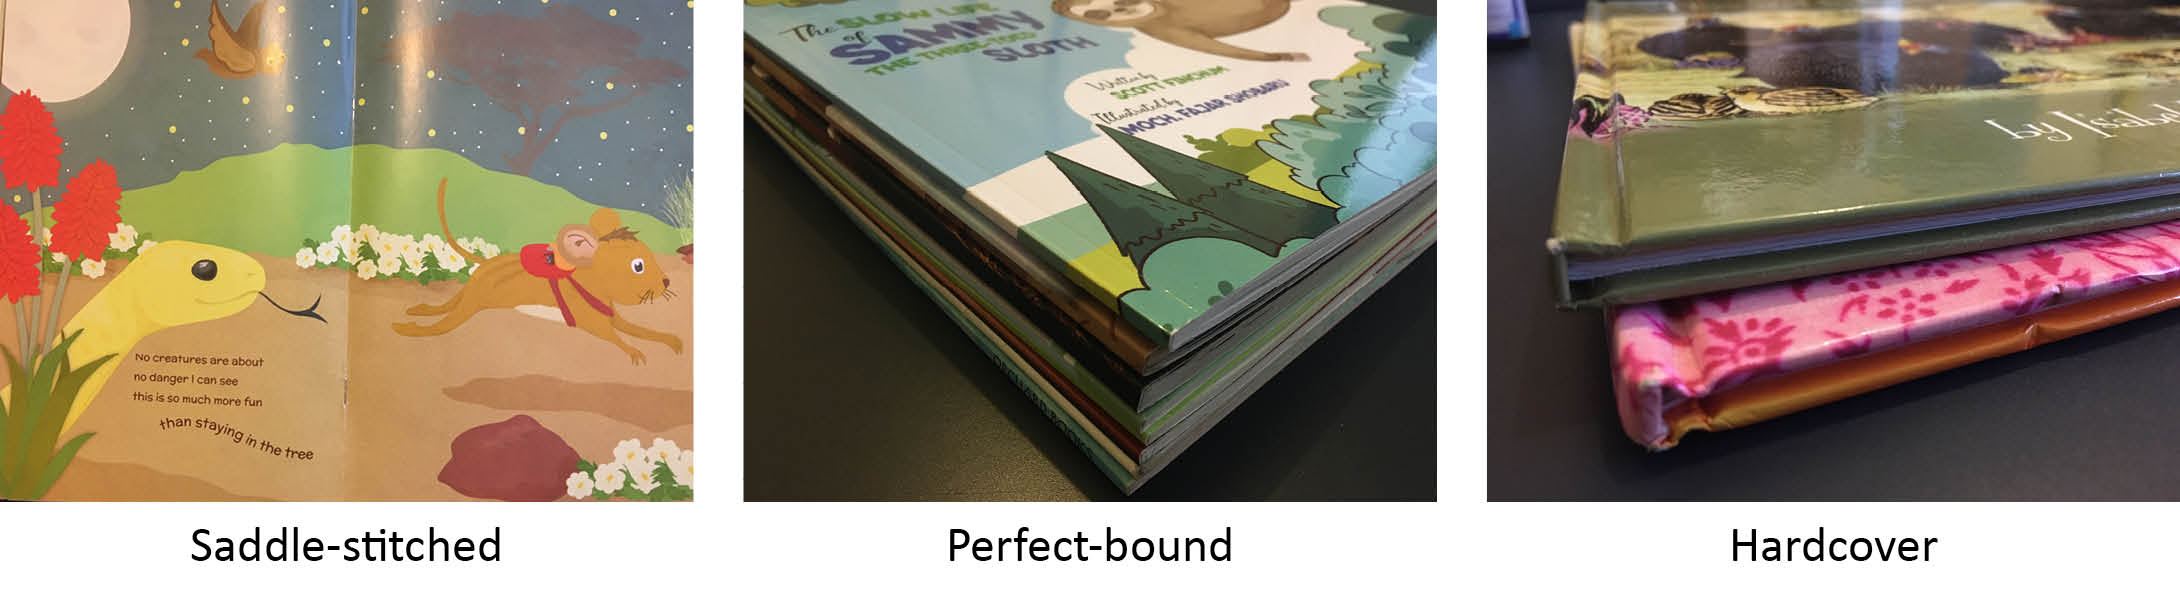 Paper type:
KDP does not give you options for the interior paper type – which will be white bond paper (the same as your printer paper), so another easy choice. IngramSpark does offer glossy paper options though. |
bryonyI have been in the publishing industry for 20 years and have worked for several publishing houses and international organisations. Several of my children's books have won awards. ArchivesCategories
All
|


 RSS Feed
All Rights Reserved © Heartstone House Ltd